By William Ozark

Centerpiece models are often the most eye-catching miniatures on the tabletop due to their size and number of details. These are models that cannot help but draw attention from across the room and highlight the artistic side of the miniature wargaming hobby. They provide an opportunity to demonstrate your artistic talents and improve your hobby skills. However, the challenge presented by these models can intimidate both new and experienced painters alike. On more than one occasion I have opened a centerpiece model kit and thought, “Oh, what am I getting myself into?”, or I assemble the model only for it to sit on the shelf unpainted for months while I muster the courage to start.
I have found that developing a plan prior to the first application of paint on the model will help me get started, while keeping me motivated throughout the painting process, and often results in the project taking less time overall. The initial investment in time to plan is well worth it for the overall success of the project.
When I am initially evaluating the model I like to ask the following questions:
- Can I paint this model fully assembled or is there a good reason for subassemblies? Reasons for subassemblies could be difficult to reach areas or magnetized components.
- What are the different elements that compose the model? These could include things like skin, hair, clothes, armor, weapons, internal machinery, or bones among many others.
- What is the color scheme for the model going to be and how is that applied across the elements?
- What are the areas of interest that I want to pop? Usually this will include the head of the model if present but also includes areas of high detail such as crests, murals, symbols, weapons, special effects, etc.
After answering the above questions I like to come up with the order in which I will be painting each of the elements. I determine this order by assigning each element to either the base layer, an intermediate layer, or the final layer. By breaking up the model into elements and layers you make a potentially overwhelming project into a series of discrete chunks that feel more reasonable to achieve.
The base layer is the innermost layer that the rest of the model’s details are built on top of. For a humanoid model this will often be the skin or undergarments while a mechanical model could have its exposed internal machinery. Determining the base layer is important because it is quite difficult to go back to an area you have already painted and paint deeper details without inadvertent paint spillage onto an already finished area. Proper sequencing will save time by reducing the need to touch up or make larger painting repairs.
Intermediate layers can be made for every individual element or in larger groupings. The intermediate layers are a tool for work sequencing and knowing what elements you can jump between painting will the other dries or you need a change of pace can be useful. The important thing is to avoid putting elements that are on top of each other in the same layer. Again, you always want to be building up on each subsequent layer. For example, you would not put the base color of an armor plate and the armor trim in the same intermediate layer.
The final layer will be the outermost elements and usually contain most of the areas of interest identified in question 4. Your model might not have “come together” until you get to this step so it can feel quite rewarding to see your perseverance pay off as you see the whole picture. Be sure to take all the time you need to really make the model shine after all of the work building up to this point.
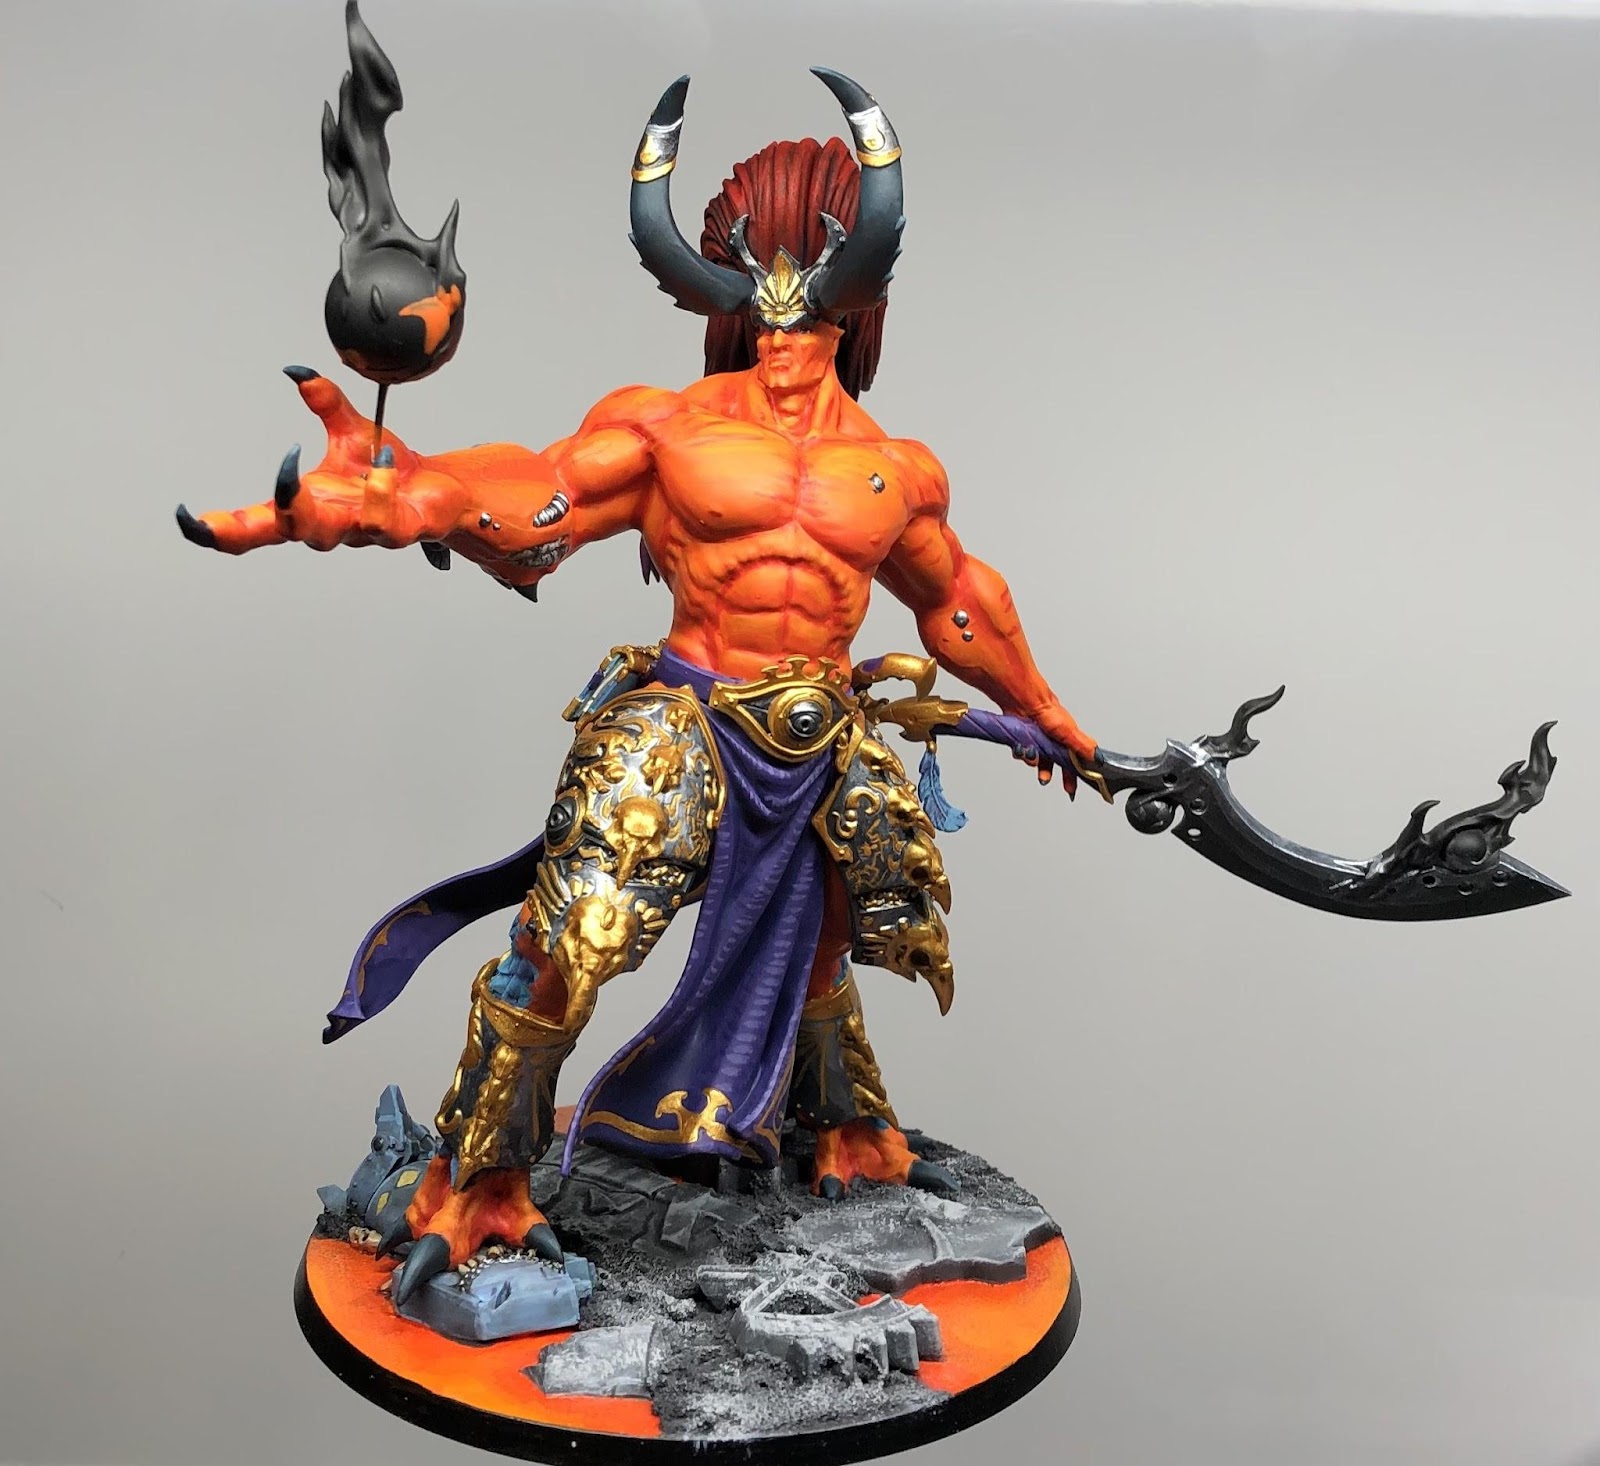
Now that I have gone over my process, here is an example using a recent model I have painted at the time of writing this article, Magnus the Red from Games Workshop.
Asking my initial questions I have the following answers:
- I have magnetized Magnus’ wings so I will be painting his main body and wings separately
- Different elements include his skin, eyes, cloth, horns and nails, amor, hair, wings, magic effects, and the rock and lava portions of the base
- I have previously developed the orange, purple, turquoise, and gold trim paint scheme for my Thousand Sons army so I apply that towards the model. I do make a change in giving his armor base color silver compared to the usual turquoise I have been using.
- Areas of interest are his his head, the magic effects and tattoo on his right arm, and I want to freehand his symbol on the cloth
The base layer for Magnus will be his skin, which I have chosen to be P3’s Inferno Orange. I shade by mixing in P3 Khador Red base and then do a few highlight layers by mixing in P3 ember orange and then P3 Cygnus Yellow into the base color. As part of the skin layer I paint the eye in his head and right palm since they are set in the skin. I also paint the basing’s lava with the same colors and topping it off with P3 Blazing ink. The ink helps set a glossy look for the lava to help separate it visually from the skin.

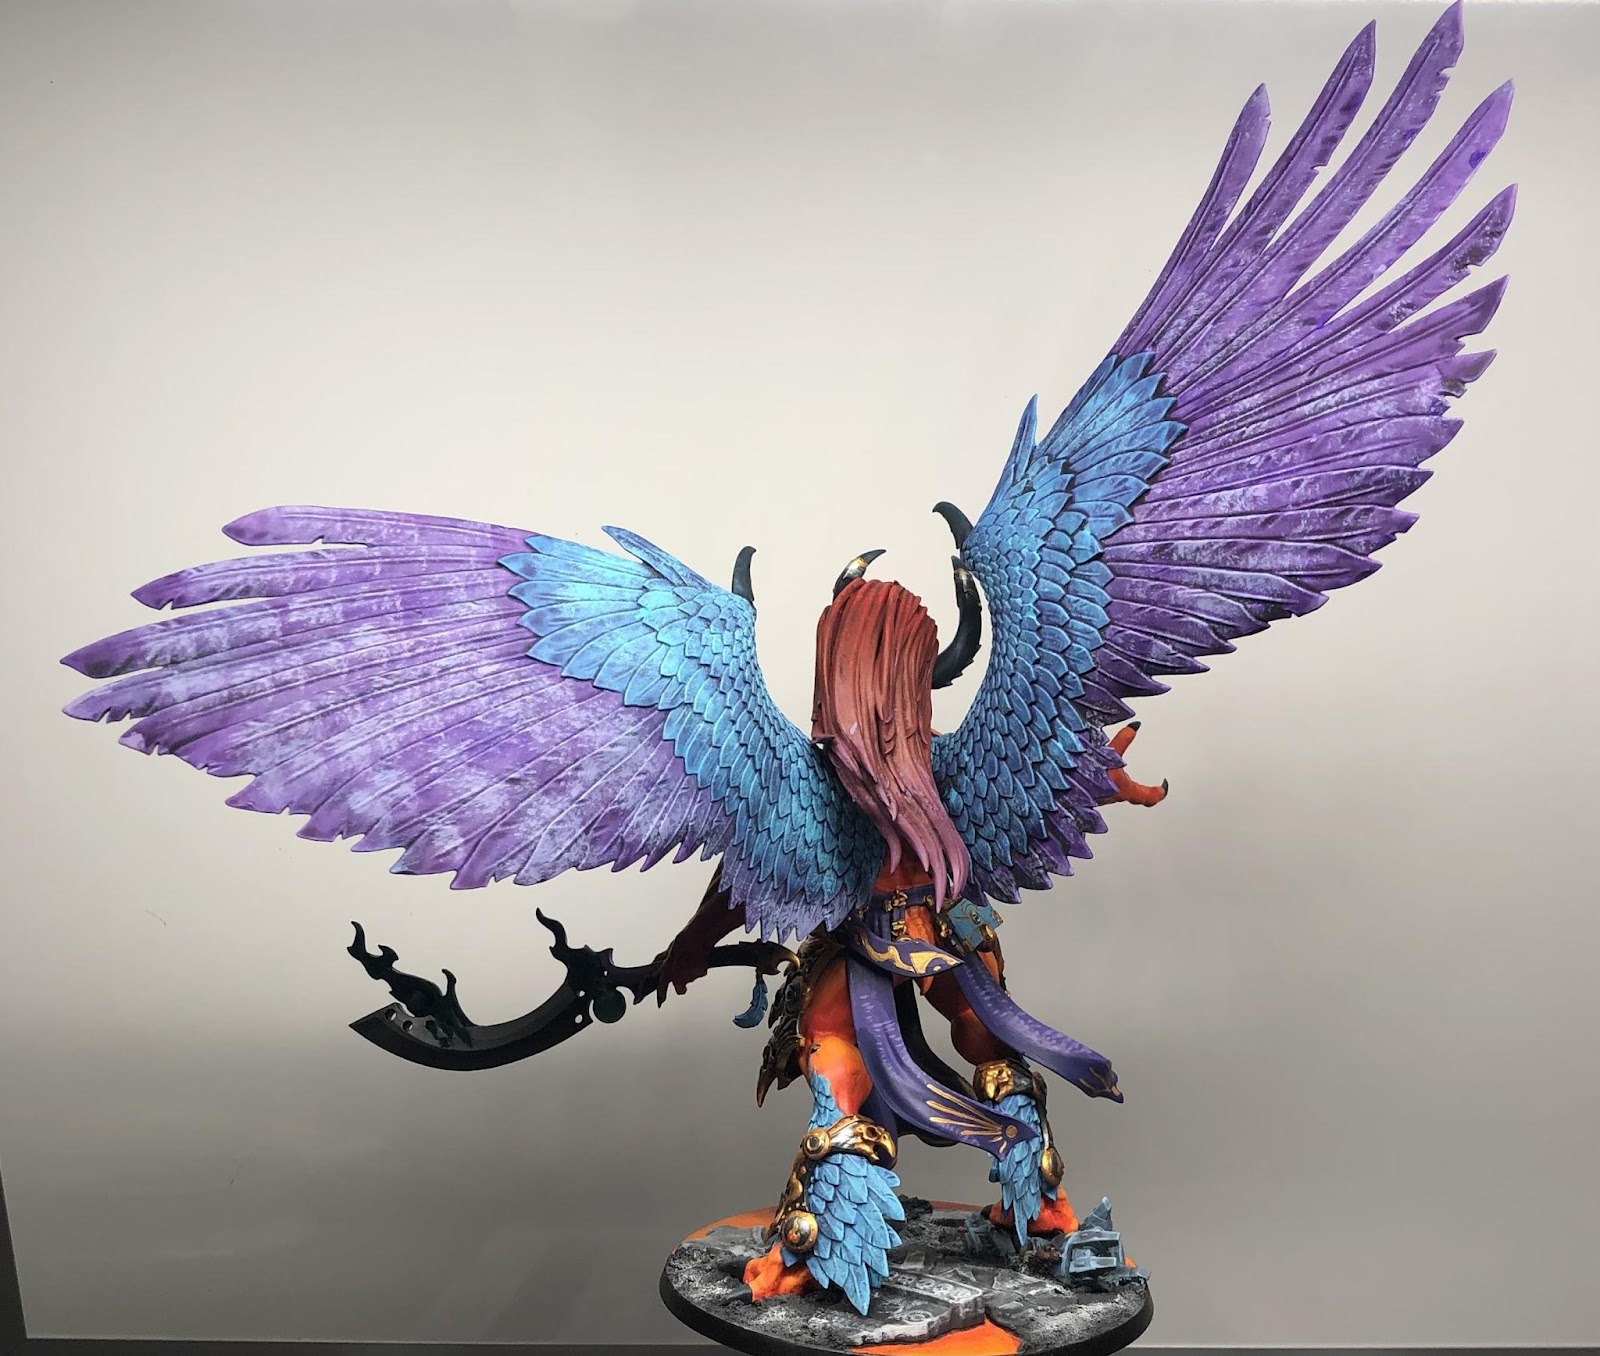
The first intermediate layer includes the purple cloth, sword handles, spell book, and the feathers protruding out of his limbs. The purple cloth is P3 Beaten Purple. Then shading is P3 Exile Blue mixed in. Highlight layers include P3 Arcane Blue and P3 Morrow White. The top highlights are applied as horizontal lines to impart a texture of the weave in the fabric on the model. The feathers are Pro Acryl Turquoise, the shade is a wash of Citadel Druchii Violet, and then a drybrush of Pro Acryl Turquoise to restore color and define the feathers while also adding an additional texture to the model.


The second intermediate layer I paint his hair, horns & nails, and the base. The hair is a P3 Khador Red Base, P3 Beaten Purple, and Pro Acryl Magenta, which are then shaded by Citadel Druchii Violet before being drybrushed with their respective colors again. The horns and nails are P3 Coal Black shaded by P3 Thamar Black and highlighted with P3 Morrow White. The base is Pro Acryl Neutral Grey, shaded with citadel nuln oil, and highlighted with a drybrush of Pro Acryl Light Neutral Grey. The stone should have been in the previous layer but I forgot to take the picture at the correct time.


The third layer is the armor, sword, and mechanical hookups on the body. The base color is Pro Acryl Dark Silver, which is followed by a shade of Citadel Nuln Oil in the recesses. The first highlight is mixing in Pro Acryl Silver to the case and then the final highlight is pure Pro Acryl Silver.


The fourth layer is the gold trim on the armor, armor details, sword pommel, trim on the book, and details on the cloth. The base of the gold is Pro Acryl Rich Gold, shaded by Citadel Druchii Violet, and then a bit of Pro Acryl Bright Gold mixed into the Rich Gold for the highlights.

The final layer includes the previously identified areas of interest of the magic effects, forearm tattoo, gemstones, and freehanding a Thousand Sons symbol onto the cloth. The magic effects and tattoo are a base of P3 Eldritch, shaded by mixing in P3 Coal Black and highlighted by mixing in P3 Underbelly Blue into the base. For the tattoo I then mix in P3 Morrow White for the highpoints. I finish the magic effects by glazing a mix of P3 Green Ink and P3 Blue Ink over the whole magic effect. The gemstones are simply an application of Citadel Spiritstone Red over the gold. The freehand symbol color is Pro Acryl Turquoise.


I have now completed the main body so I start the process over again and paint the next sub assembly of the wings. The turquoise portions of the wings and armor use the same paints used in those body steps. The purple of the wings in Pro Acryl Purple, then shaded by Citadel Druchii Violet, and then being drybrushed with the purple again. The symbols on the wing are P3’s inferno orange to tie into the skin. I then do a few highlight layers by mixing in P3 Ember Orange and then P3 Cygnus Yellow into the base color with a final layer of pure Cygnus Yellow. After the wings are done the entire model is complete.


Hopefully this article gives you some ideas and inspiration to come up with your own Plan of Attack for your centerpiece models. I look forward to seeing more large painted models on the tabletop. Good luck painting and have fun.
